Environmental Engineering Projects

The human population on Earth is now more than 6 billion, and still growing. With more and more of us living an energy-intensive, modern lifestyle, the environmental stresses from human activity continue to increase. Greenhouse gases leading to global warming and fertilizer run-off resulting in marine "dead zones" are just two examples of large-scale environmental impacts from human activity. For tackling big problems like these, we'll need people who can understand complex ecosystems, and who can apply that knowledge to satisfy human needs in sustainable ways—people like environmental engineers.

Additional Project Ideas For Environmental Engineering

  • A Bright Idea for Saving Energy
    In the U.S., lighting homes and businesses accounts for 22% of all electric power consumption (Raloff, 2006). That's $55 billion worth of electricity, or the output of 100 large power plants (Raloff, 2006). How much energy could be saved by switching home lighting from incandescent to more efficient fluorescent lights? Conduct a survey to find out what types of lighting are used in homes in your area. Come up with an estimate of how many light fixtures are used in an average home, what types of light source (regular incandescent, halogen, fluorescent). Do background research to find out the relative efficiency of different types of lighting. How much energy could be saved by replacing incandescent lights with more efficient alternatives? Taking into account the cost of the lamps, how much money would be saved (if any)? You might also want to look into new lighting technologies like LEDs (Raloff, 2006; NGLIA, 2005). Could future light sources offer even more savings? (Idea from Langiewicz, M.T., 2004)

    • Langiewicz, M.T., 2004. "How To Eliminate the Energy Crisis in California," California State Science Fair Abstract [accessed June 20, 2006] http://www.usc.edu/CSSF/History/2004/Projects/J0819.pdf.
    • NGLIA, 2005. "Changing the Light Paradigm," Next Generation Lighting Industry Alliance [accessed June 20, 2006] http://www.nglia.org/.
    • Raloff, J., 2006. "Illuminating Changes: Conventional Lightbulbs May Soon Be Obsolete," Science News 169(May 20): 314.

  • Remodeling and Energy Efficiency
    Has your house (or one of your friend's houses) been remodeled recently? Were any improvements made for energy efficiency (solar systems, better insulation, passive solar heating, better lighting)? Compare your family's energy costs for a similar time period before and after the remodeling (remember that energy usage often varies seasonally). Monthly bills often have a bar graph showing energy usage for the previous 12 months. You may also be able to get information on past energy usage through your electric company's website. Ask your parents for help to access the online records. Did the improvements save you money? Analyze the cost of the remodeling work that was specific to energy efficiency (for example, if your house got a new roof, and insulation was added, find out what was the extra cost for the insulation, don't use the entire cost of the roof). Calculate how long it will take for the energy savings to pay for the improvements.

  • The Power of Balance
    The Falkirk Wheel
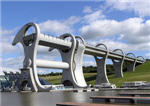
The Falkirk Wheel is a rotating boat lift connecting the Forth and Clyde Canal with the Union Canal near Falkirk in central Scotland. It consists of two diametrically opposed caissons which rotate to lift boats between the two canals through a height of 35 meters. The wheel is always perfectly balanced and, despite its enormous mass, rotates through 180° in less than four minutes, using just 1.5 kilowatt-hours (Wikipedia contributors, 2006). Do background research to find out how much energy would be required if a system of locks were used to raise the boats instead of the Falkirk Wheel. How much energy is saved? For a more advanced project, include a comparision of construction costs for a system of locks vs. the Falkirk Wheel.

    Wikipedia contributors, 2006. "Falkirk Wheel," Wikipedia, The Free Encyclopedia [accessed June 20, 2006] http://en.wikipedia.org/w/index.php?title=Falkirk_Wheel&oldid=59868527.

  • Do Plants Promote Pesticide Breakdown?
    When pesticides are applied to protect crops, run-off of potentially harmful pesticides is a major problem. Can water plants such as hardstem bulrush, common cattail, parrotfeather and smooth scouring rush promote pesticide breakdown? If so, diversion of irrigation run-off into plant-filled ponds could help reduce pesticide pollution. Mix malathion at 12.5% of the recommended application strength (to simulate dilution by rain or irrigation water). Use 5-gallon buckets for testing various water plants. Each bucket should have at least 2 gallons of diluted malathion, and should be about 1/4 full with plants. One control bucket should contain no plants. At various time intervals (12 hours, 1 day, 2 days, 4 days) test the water for the presence of pesticides. For example, you can add water from the test bucket to a small container with an airstone and a tadpole or minnow. Time how long the tadpole or minnow survives after addition of the test water sample. Does the presence of plants in the test buckets increase survival time? Are some plants better than others at promoting survival? (Fox, 2005; Fox, 2006) As an alternative to animal testing, a mentor with expertise in analytical chemistry could assist you with developing a chemical test for malathion and its breakdown products.

  • Fighting Litter in Your Neighborhood
    Is there a public park, playground, or beach near you that suffers from a litter problem? Here is a way that you can do something about it! First, get a measure of the size of the problem by conducting a litter survey. Select a fraction of the area to survey at regular intervals (e.g., every two or three days, or maybe once a week). The area should be large enough so that you can get a representative sample of litter, but not so large that you can't clean it up. Each time you conduct your survey, collect all of the litter within your sample area. Count or weigh each type of litter, and keep track of your results in your lab notebook. Which is the most common type of litter? Have your parents, your teacher, and local community groups help to publicize your results. For example, you could post signs on the trash containers listing how much litter the park gets per week, reminding people to clean up after themselves. See if your local Parks Department can help. Maybe they can organize a cleanup day with help from your community. Does the park stay cleaner after your efforts? (Idea from Cannon, 2005)

    Cannon, K.B., 2005. "What Is the Most Commonly Found Litter on the Beach?" California State Science Fair Abstract [accessed June 20, 2006] http://www.usc.edu/CSSF/History/2005/Projects/S0802.pdf.

  • Can Mulch Reduce Garden Water Requirements?
    Divide a part of your garden into two equal plots, with each plot receiving equal amounts of sun. Cover one plot with two inches of organic mulch, such as compost or ground bark. Leave the other plot uncovered. Use the same amount of water for each plot for two or three weeks. At the beginning of the experiment, and at one-week intervals, dig down and check the soil in each plot for moisture content. Which plot holds water better? Which plot shows better plant growth? (McCausland, 2006)

    McCausland, J., 2006. "Smart Summer Watering," Sunset July, 2006: 68.

Resources

Sources for Additional Project Ideas

Free Lunch? Can Solar Energy Systems Pay for Themselves with Utility Bill Savings?

Objective

The goal of this project is to investigate the costs and benefits of active and passive solar energy systems. Specific questions that an Investigator might pursue with this project are:

  • Is it worthwhile for a homeowner with a 2000 square foot home and a family of four in Sacramento, CA to invest in a home solar thermal electricity energy system for electricity, home heating, and hot water?
  • Which home solar energy components are most efficient in terms of energy saved per dollar of investment?
  • Can passive solar design techniques (heating, lighting) be included in remodeling plans and pay for themselves in savings?

Introduction

There are lots of reasons for interest in renewable energry sources, for example: the rising cost of crude oil and natural gas, concerns about the limits of the global supply of these commodities, greenhouse gases and global warming, air pollution, dependence on foreign suppliers, to name just a few. This project focuses on one renewable energy source: solar energy.

As you do your background research for this project, you'll find that the term "solar energy" covers a huge range of technologies. There are "passive solar" design techniques to make maximal use of sunshine for heating and lighting needs. There are also "active solar" systems, such as photovoltaic arrays, that directly convert sunlight into electricity and solar thermal electricity systems that use solar heat to generate electricity (and, possibly, hot water for home heating and domestic use). Depending on your interests, you may choose to do a survey-type study comparing the costs and benefits of a number of different technologies. Or, you may want to focus on one particular technology and investigate the costs and benefits under different scenarios.

This project challenges you to answer the kind of question that engineers (and ordinary homeowners) face all the time: How much does a particular technology (or design element) cost, and what is the value of the benefit(s) it provides? This project will require lots of background research.

You can probably come up with hundreds of examples of this type of question, but for your science fair project, you'll just need one good one. Some sample questions are provided in the Objective section, above, and in the Variations section, below. The good thing is that you can tailor this project to your own interests. For the purposes of illustration, we'll use the first question as our example: Is it worthwhile for a homeowner with a 2000 square foot home and a family of four in Sacramento, CA to invest in a home solar thermal electricity energy system for electricity, home heating and hot water?

Terms, Concepts and Questions to Start Background Research

To do this project, you should do research that enables you to understand the following terms and concepts:

  • active and passive solar energy devices,
  • "green" building designs,
  • photovoltaic arrays,
  • solar thermal electricity energy systems.

Questions

  • How do solar energy system manufacturers and installers come up with their estimates for energy savings from their systems?

Bibliography

Materials and Equipment

To do this project you will need the following materials and equipment:

  • computer with Internet access,
  • notebook,
  • calculator and/or computer spreadsheet program (e.g., Microsoft Excel or WordPerfect QuattroPro).

Experimental Procedure

  1. Do your background research on solar energy technologies. Pick a technology that interests you and come up with a well-defined cost-benefit question to answer. For example: Is it worthwhile for a homeowner with a 2000 square foot home and a family of four in Sacramento, CA to invest in a home solar thermal electricity energy system for electricity, home heating and hot water?
  2. Make a list of what you'll need to find out in order to answer your question. Here are some examples to get you started:
    1. How much will the homeowner have to pay for the system components and installation? Get estimates for typical systems from contractors with experience installing these types of systems. You can also ask about expected energy savings. You may want to consider the effect of government-sponsored rebate or tax credit programs.
    2. What are the annual energy costs for a typical household? Research this on the Internet or check with your local utility company for information.
    3. What energy savings will be realized after installation of the system? Will the system replace 70% of the household's energy needs? 85%? 100%? What data is available to support this replacement percentage?
    4. Related questions to consider are: What happens on days when there is little sun? Does the utility company provide a credit on days when the system supplies net energy to the electrical grid?
  3. Do research to gather the needed information.
  4. One of the difficulties you face in answering cost-benefit questions is how to deal with unknowns. For example, when calculating the energy savings, a huge consideration is the future cost of electricity from the utility company. In order to calculate how much the homeowner might save, you have to make some assumptions about how much electricity will cost in the future. One good approach is to try to bracket your estimates with a "best case" and a "worst case" analysis. Here are some additional suggestions to keep in mind when researching unknowns:
    1. Try to gather information from as many different points of view as you can. When you find disagreements, read the arguments and counter-arguments carefully. Is one argument more convincing than another? Why?
    2. Do a "reality check": look for independent verification of the facts and statistics used to support each case.
  5. State your assumptions clearly. Justify your assumptions. Always provide your research sources. If new information later becomes available to you (or your readers), you will be able to go back and see how the new information might change your analysis and conclusions.
  6. Crunch the numbers. Here is where a spreadsheet program can be really helpful. You'll probably want to do your analysis for a matrix of different scenarios. For example: high, medium and low-cost systems (each with a different rate of energy savings); above-average, average and below-average annual family energy usage; best-case, average-case, worst-case analysis for future energy costs.
  7. Compare and present the results. For example, create a graph to show for each scenario how many years it will take for the system to pay for itself in energy savings.

Variations

  • For a family of four living in an average-sized home in New England, how many years will it take for a home solar thermal electricity system to pay for itself in savings?
  • For new home construction, pick 3–5 passive solar design techniques and analyze design and construction costs and potential energy savings. Compare to a house of the same size built on a similar location without these features.
  • Has your house been remodeled recently? Were any improvements made for energy efficiency (solar systems, better insulation, passive solar heating, better lighting)? Compare your family's energy costs for a similar time period before and after the remodeling (remember that energy usage often varies seasonally). Did the improvements save you money? Analyze the cost of the remodeling work that was specific to energy efficiency (for example, if your house got a new roof, and insulation was added, find out what was the extra cost for the insulation, don't use the entire cost of the roof). Calculate how long it will take for the energy savings to pay for the improvements.
  • How much of a factor would geography play in your analysis? Some possible effects to consider: differences in seasonal temperature swings and patterns of energy use, differences in available sunlight, differences in average home size, differences in construction costs.

Credits

Andrew Olson, Ph.D., Science Buddies

Smart Watering: Adjusting Your Sprinklers for Optimal Soil Moisture

Objective

The goal of this project is to conduct a water audit of your home sprinkler system to see if you can save water while keeping your lawn and garden lush.

Introduction

Watering your lawn and garden can easily account for more water use than anything else around the house. This project will show you how to make sure that your sprinkler system is not wasting water.

The easiest way to measure soil moisture is to use a soil probe (see the Materials & Equipment section, below). You should be able to find one at a hardware store or gardening center near you. With the the soil probe you can take a small "core sample" from your lawn so that you can see the profile of soil moisture at the surface and at the plant roots. It's a lot easier than digging a hole with a shovel or trowel, and it disturbs a much smaller area.

The soil probe is also useful for gathering soil samples for soil nutrient testing. Buy a soil test kit and use it to measure the nutrients in your soil. This way you can buy fertilizers that replace only the nutrients that your soil needs.

Terms, Concepts and Questions to Start Background Research

To do this project, you should do research that enables you to understand the following terms and concepts:

  • root depth,
  • soil moisture.

Bibliography

Materials and Equipment

To do this experiment you will need the following materials and equipment:

  • several (5–10) same-size containers for collecting water (empty cans work great),
  • instructions for your sprinkler controller,
  • shovel, trowel, or soil probe (see picture, below) to test soil moisture at root depth. You should be able to find a soil probe at your local garden center or the gardening department of the hardware store.

    A soil probe
    A soil probe (shown above) is a tool for taking a core sample of soil. It is very useful for checking the moisture content of the soil at root depth. You can also use it for collecting soil samples for nutrient testing.

  • Optional: monthly water bills with record of usage from your parent (may be available online from your water company),
  • camera for before and after photos of lawn and garden areas.

Experimental Procedure

Measuring Soil Moisture at the Roots

You will be measuring soil moisture many times during this project in order to figure out how quickly your lawn dries out, and how deeply water penetrates when you run the sprinklers. Here is a procedure for measuring soil moisture with a soil probe (City of Greeley, 2006).

  1. Push the soil probe into the soil as far as it will go. (If it will not go in, the soil is too dry or compacted. You will need to water the soil first.)
  2. Twist the soil probe slightly and pull it out of the ground.
  3. Feel the soil. If the soil is moist, there is no need to water at this time.
  4. Check the root depth. Look at the soil sample to see how far the grass roots extend into the soil. The deeper the roots, the healthier the landscaping. Your sprinklers only need to water enough to penetrate to the root depth. The grass can't absorb water from below this depth, so water penetrating further than this is wasted.
  5. Optional: take pictures of the soil cores to show the different moisture conditions on your display board.
  6. After you have made your measurements, replace the soil sample in the ground and tamp it gently into place.
  7. The pictures below show different moisture conditions you might find (City of Greeley, 2006).
    Wet Below the Roots. Rains can move water deep into the soil well past plant roots. Consistent watering below the root zone only wastes water. Use the soil probe to measure the root and moisture depth. Picture shows severe over-watering, note the muddy soil on top, and very shallow root depth.
    Soil is wet below the roots.
    Dry on Top and Wet Below. This is the most common finding. If the soil looks dry on top, from the sun, it is thought that it's time to water. Use the probe to check the moisture in the plant's root zone before turning on the water. This picture shows ample moisture in the root zone.
    Soil is dry on top and wet below.
    Dry on Top and Dry Below. Observe the plants, if they have begun to show signs of stress, watering was needed sooner. However, if there are no signs of stress or wilting, you can see how long to let the soil dry before watering. In this case, the turf is still very green, the water can remain off.
    Soil is dry on top and dry below.

Checking Out Your Sprinkler System

  1. Have one of your parents show you how to use the electronic controller for the sprinkler system, or learn how to use it by reading the instruction manual.
  2. Go through the controller's programs and write down the number of minutes that the sprinklers are turned on for each zone, and the number of times per week that each zone's sprinklers are activated. Calculate the total number of minutes per week for each zone. This is your baseline number.
  3. Check out each zone for uniformity of water distribution.
    1. Randomly place cans within the zone and run the sprinklers for the zone for 5 or 10 minutes. To prevent tip overs, use a double cup to measure the water. Pin one cup down in the grass with a golf tee, then put a second cup inside it to collect the water. No tip overs!
    2. While the sprinklers are running, check to make sure that each head is operating properly. Check for proper alignment and flow rate, and make sure that there are no leaks.
    3. Measure the depth of water in each can.
    4. Calculate the average depth of water for all of the cans. This will tell you how many centimeters of water your system delivers to the zone within the 5 or 10 minute time period.
    5. Calculate the standard deviation of the water depth for all of the cans.
    6. If any of the cans has significantly more or less water than the others (say, more than 2 standard deviations from the mean) check the sprinkler heads in the area around that can. If there was too little water, the head may be misaligned, or it may have too low a flow rate, or it may be clogged. If there was too much water, the head may have too high a flow rate or a leak.

Use Soil Moisture to Optimize Sprinkler Running Time

  1. Make a map of your yard and identify the different microenvironments for soil moisture sampling. For example, shady vs. sunny areas, grassy areas vs. garden areas, high vs. low areas. Be observant and note where soil dries out more or less quickly than other areas. At a minimum, you will want to check the soil in each of the control zones of your sprinkler system.
  2. Optional: take "before" pictures of each zone on your map.
  3. Use the soil moisture testing procedure above. If your soil probe showed moist soil, there is no need to water at this time. Adjust the watering time on your irrigation system's clock, or better yet, turn off the automatic sprinklers completely until the soil dries out.
  4. When you water, keep track of the number of minutes your sprinkler system runs. From your water can calculations (above) you can figure out how many centimeters of water you are delivering with each cycle. Adjust the number of minutes the sprinkler system runs for each zone according to your soil moisture measurements. (Decrease the number of minutes if the soil is too wet; increase the number of minutes if the soil is too dry.)
  5. Repeat soil probe sample periodically until you understand the water needs of various areas of your landscaping. At first, you should test before and after each sprinkler run. As you collect more measurements, you should be able to use them to predict how much water each area of your lawn needs. For each zone, make a graph of soil moisture depth vs. number of centimeters of water delivered by the sprinkler system.
  6. If it rains during your experiment, you can put out cans to measure the amount of rainfall (or check the local weather report if you're not able to do this). Check with your soil probe to see how far the rainwater penetrated into the soil. If you have enough data from your sprinkler system, you might be able to make a good guess at how much rain fell!
  7. Soil probes can also be used to monitor moisture in flower beds, ground cover areas, and other plantings. Remember: these areas generally need about half the water needed by grass.
  8. After 1–2 weeks, compare the amount of water you use for your lawn now to the amount at the beginning of the experiment. Are you using more or less?
  9. Optional: take "after" pictures of each zone on your map. Are your lawn and garden greener and healthier than before?

Variations

  • Can Mulch Reduce Garden Water Requirements? Divide a part of your garden into two equal plots, with each plot receiving equal amounts of sun. Cover one plot with five centimeters of organic mulch, such as compost or ground bark. Leave the other plot uncovered. Use the same amount of water for each plot for two or three weeks. At the beginning of the experiment, and at one-week intervals, dig down and check the soil in each plot for moisture content. Which plot holds water better? Which plot shows better plant growth? (McCausland, J., 2006)
  • Does your lawn need more water in hotter weather? Keep track of the daily temperature in your lab notebook so you can graph soil moisture vs. temperature. Do you need to run the sprinklers longer to keep soil moisture optimal in hotter weather? Can you figure out how much additional water each zone requires for a 5° increase in daily temperature?

Credits

Andrew Olson, Ph.D., Science Buddies

Sources

From Your John to the School Lawn: Is Recycled Water

Objective

The objective of this project is to investigate: does watering with recycled water affect the safety of school lawns?
Hypothesis: I think that watering with recycled water does not affect the safety of school lawns.

Experimental Procedure

I grew three patches of lawn in three separate miniature greenhouses using plastic boxes, chicken wire, and clear plastic trash bags. I watered one with recycled water, one with distilled water, and the other container with tap water. I measured their growth rate and compared the appearances of the grass patches in each container. I collected water runoff samples and tested each for pathogens, nutrients, and other characteristics.

Credits

Theresa J. Hannig

Now You're Cooking!

Objective

This project is based on a simple box-type solar oven you can build yourself from simple materials like cardboard boxes and aluminum foil. After you've built your oven, you'll come up with ideas for improving the design. Can you build a second oven that will work more efficiently than the first one?

Introduction

Solar ovens can cook food, pasteurize water, or even sterilize instruments using only the power of the sun. How does a solar oven work? The simple answer is that it is designed to absorb more heat than it releases.

Figure 1, below, shows a picture of the type of efficient, easy-to-build solar oven that you will be making and testing in this project. The oven is a box within a box. The inner box is covered with a plastic window (made from a heavy plastic cooking bag available at most grocery stores). The plastic window works like a greenhouse roof, allowing direct and reflected sunlight to pass into the inner box, while retaining radiated heat.

An easy-to-build solar oven made from cardboard boxes, foil, and a plastic cooking bag.
Figure 1. This box-type solar oven is both easy-to-build and very inexpensive! (SCI, 2006c)

At the bottom of the inner box, there is a foil-covered shelf, painted black. The shelf serves two purposes. First, it holds the cooking pot. Second (and more importantly) it acts as a "heat sink." The shelf absorbs direct and reflected sunlight, which warms it. It then radiates the heat, warming the inner box. The plastic window holds the heat in, as does the insulating air space between the inner box and the outer box.

The Experimental Procedure section gives you step-by-step instructions on building a simple box-type solar oven (SCI, 2006c). To make this into a complete science fair project, you will need to choose some aspect of the solar oven design to improve and test. Your choice should be based on your background research, and on the experience gained from building the first oven. Build a second oven that includes your design improvement, and make measurements to see if you have improved the oven's performance. You can test your oven by: measuring the internal temperature with an oven thermometer, or by timing how long it takes to boil a given amount of water in a cooking pot.

Don't worry about the oven catching fire. Paper burns at 233°C (451°F), and your solar oven won't get that hot (SCI, 2004).

When you're finished, it would be fun to try using your solar cooker to make a meal. The "Solar Cooking Hints" webpage listed in the Bibliography (SCI, date unknown) has some suggestions. Generally it takes about twice as long to cook food with a solar oven than in a conventional oven, so you'll need to plan ahead. Rice is a good first dish to try.

Terms, Concepts and Questions to Start Background Research

To do this project, you should do research that enables you to understand the following terms and concepts:

  • heat sink,
  • radiant heat transfer,
  • convective heat transfer,
  • solar energy.

Questions

  • How hot does a typical box-type solar oven get?
  • How hot does an oven need to be to cook food?
  • Can a solar cooker work on a cloudy day?
  • Why paint the oven shelf black? Why use a black cooking pot?

Bibliography

  • The Solar Cooking Archive is a great source of information on solar ovens:
    SCI, 2006a. "Solar Cooking Archive," Solar Cookers International [accessed July 17, 2006] http://solarcooking.org/default.htm.
  • You can find a bunch of alternative solar oven plans on this page:
    SCI, 2006b. "Solar Cooking Plans," Solar Cooking Archive, Solar Cookers International [accessed July 17, 2006] http://solarcooking.org/plans.htm.
  • SCI, 2004. "Solar Cooking Frequently-Asked Questions," Solar Cooking Archive, Solar Cookers International [accessed July 17, 2006] http://solarcooking.org/solarcooking-faq.htm.
  • SCI, date unknown. "Solar Cooking Hints," Solar Cooking Archive, Solar Cookers International [accessed July 17, 2006] http://solarcooking.org/cooking-hints.htm.
  • Aalfs, M., date unknown. "Principles of Solar Box Cooker Design," Solar Cooking Archive, Solar Cookers International [accessed July 17, 2006] http://solarcooking.org/sbcdes.htm.
  • Sponheim, T., date unknown. "Developing an Intuitive Feel for the Dynamics of Solar Cooking," Solar Cooking Archive, Solar Cookers International [accessed July 17, 2006] http://solarcooking.org/intuit1.htm.

Materials and Equipment

To do this experiment you will need the following materials and equipment:

  • two cardboard boxes;
    Notes on boxes:
    • The inner box should be at least 38 cm × 38 cm (15" × 15"), but bigger is better.
    • The inner box definitely has to be large enough to hold the cooking pot that you intend to use, plus a 2.5 cm air gap.
    • The outer box should be larger all around, but it doesn't matter how much bigger, as long as there is at least 1.5 cm (about half an inch) or more of airspace between the two boxes.
    • The distance between the two boxes does not have to be equal all the way around.
    • Finally, keep in mind that it is very easy to adjust the size of a cardboard box by cutting and gluing it.
  • ruler or measuring tape;
  • straightedge;
  • utility knife;
  • stylus for scribing cardboard (e.g., ballpoint pen with rounded cap—use it with the cap on);
  • one sheet of cardboard to make the lid (this piece must be approximately 4–8 cm (2–3") larger all the way around than the top of the finished cooker);
  • short piece of coat hanger wire to make a prop for the lid;
  • pair of pliers for cutting and bending coat hanger wire;
  • one sheet of cardboard to make the shelf/heat sink (same size as the bottom of the inner box);
  • several sheets of newspaper;
  • one small roll of aluminum foil;
  • one can of flat-black spray paint (says on can "non-toxic when dry"), or one small jar of black tempera paint;
  • at least 8 ounces of white glue;
  • one Reynolds Oven Cooking Bag ("turkey-size", 47.5 cm × 58.5 cm, or 19" × 23-1/2");
    Notes on cooking bag:
    • These are available in almost all supermarkets in the U.S.
    • They are rated for 204°C (400°F) so they are perfect for solar cooking.
    • They are not UV-resistant, thus they will become brittle and opaque over time and may need to be replaced periodically.
    • A sheet of glass can also be used, but this is more expensive and fragile, and doesn't offer that much better cooking except on windy days.
  • for testing your ovens under the same solar conditions, use two oven thermometers, or two identical shallow black cooking pots with covers.

Experimental Procedure

Safety Note. The solar oven you will be building is designed to cook food or boil water. Just like your kitchen oven, temperatures inside the solar cooker will be high enough to cause serious burns. Use oven mitts and proper caution to avoid burning yourself. Also, be careful with the utility knife when cutting cardboard to make the oven.

Building the Oven Base

  1. Fold the top flaps closed on the outer box and set the inner box on top. Trace a line around the base of the inner box onto the top of the outer box (Figure 2). Remove the inner box and cut along this line to form a hole in the top of the outer box.

    Marking the outer box for cutting.
    Figure 2. Marking the outer box for cutting. (SCI, 2006c)

  2. Decide how tall you want your oven to be. We recommend about 2.5 cm (1") taller than your largest pot, and about 2.5 cm (1") shorter than the outer box. This way there will be a space between the bottoms of the boxes once the cooker is assembled.
  3. Slit the corners of the inner box with a knife down to that height. Fold each side down, forming extended flaps (Figure ). Folding is smoother if you first scribe a firm line with a stylus (e.g., ballpoint pen with rounded cap on) from the end of one cut to the other where the folds are to go. Use a straightedge as a guide for your scribing tool.

    Cutting and folding the inner box to the proper height.
    Figure 3. Cutting and folding the inner box to the proper height. (SCI, 2006c)

  4. Glue aluminum foil to the inside of both boxes and also to the inside of the remaining top flaps of the outer box. Don't waste your time being neat on the outer box, since it will never be seen, nor will it experience any wear. The inner box will be visible even after assembly, so if it matters to you, you might want to take more time here. Glue the top flaps closed on the outer box.
  5. Place some wads of crumpled newspaper into the outer box so that when you set the inner box down inside the hole in the outer box, the flaps on the inner box just touch the top of the outer box (Figure 4).

    Putting the inner box in place.
    Figure 4. Putting the inner box in place. (SCI, 2006c)

  6. Glue the flaps of the inner box onto the top of the outer box. Trim the excess flap length to be even with the perimeter of the outer box.
  7. Finally, make a shelf/heat sink inside the inner box. Cut a piece of cardboard the same size as the bottom of the inner box. Glue foil to one side. Paint the foil black and allow it to dry. Put this in the oven so that it rests on the bottom of the inner box (black side up), and place your pots on it when cooking. The base is now finished.

Building the Removable Lid

  1. Take the large sheet of cardboard and set the oven base on top of it (centered). Be sure to orient the corrugations of the lid so that they go from left to right as you face the oven so that later the prop may be inserted into the corrugations (see Figure 7,below).
  2. Trace the outline of the base onto the lid. It will help to get a good fit if you hold the pencil up against the oven base, as shown in Figure 5 (you may want to have a helper hold the oven base firmly in place as you do this).

    Marking the lid using the oven base as a template.
    Figure 5. Marking the lid using the oven base as a template. (SCI, 2006c)

  3. Use your stylus and straightedge to scribe lines for folding down the edges of the lid. You will also need to cut short flaps at the ends (see Figure 6). Fold each of the four edges along the scribed lines.

    Folding and cutting flaps for the lid.
    Figure 6. Folding and cutting flaps for the lid. (SCI, 2006c)

  4. Fold the corner flaps around and glue to the side lid flaps. (Figure 6, above). Don't glue the lid to the box. You'll need to remove it to move pots in and out of the oven.
  5. To make the reflector flap, draw a line on the lid, forming a rectangle the same size as the oven opening (inner box size). Cut around three sides and fold the resulting flap up to form the reflector (Figure 7). Cover this flap with foil on the inside.

    Making the reflector flap and prop.
    Figure 7. Making the reflector flap and prop. (SCI, 2006c)

  6. To make a prop bend a 30 cm (12") piece of coat hanger wire as indicated in Figure 7. This can then be inserted into the corrugations as shown.
  7. Next, turn the lid upside-down and glue the oven bag in place. We have had great success using the turkey-size oven bag (47.5 cm × 58.5 cm, or 19" × 23-1/2") applied as is, i.e., without opening it up. This makes a double layer of plastic. The two layers tend to separate from each other to form an airspace as the oven cooks. When using this method, it is important to also glue the bag closed on its open end. This stops water vapor from entering the bag and condensing. Alternatively you can cut any size oven bag open to form a flat sheet large enough to cover the oven opening.
  8. Once the glue dries, your oven is complete and ready for cooking.

Testing Oven Performance

  1. Time how long it takes to boil water. Use the same amount of water, at the same starting temperature for each oven. You should also use the same color and type of pot in each oven. Place the ovens side-by-side so that the test conditions are the same for both ovens. Repeat the measurement at least three times to be sure that your results are consistent.
  2. Alternatively, you could measure the temperature inside each oven. You'll need a separate oven thermometer for each oven, so that you don't have to keep opening the ovens to move the thermometer back and forth (which would cause heat loss). Check first to make sure that both thermometers give the same reading using your kitchen oven. If the readings are different, make sure that the difference is consistent, and then use the difference to correct one of the readings so that the measurements can be compared. With a thermometer, you can also test to see if the temperature inside the oven is uniform.

Improving Efficiency

The oven you have built should cook fine during most of the solar season. If you would like to improve the efficiency to be able to cook on more marginal days, you can modify your oven in any or all of the following ways:
  • Make pieces of foiled cardboard the same size as the oven sides and place these in the wall spaces.
  • Make a new reflector the size of the entire lid (see photo above).
  • Make the shelf/heat sink using sheet metal, such as aluminum flashing. Paint this black and elevate this off the bottom of the oven slightly with small cardboard strips. Note that you will want to make the inner box a bit taller to accommodate the elevated shelf.

Variations

Here are some of the many possible experiments you can try with your solar ovens. You can probably think of others yourself.

  • Test with and without a reflector.
  • Try different types of heat-absorbing materials for the oven shelf/heat sink.
  • Try different types of insulation between the inner and outer boxes.
  • Why is it necessary to paint the shelf black and to use black cooking pots? See for yourself! Try black vs. shiny shelf and cooking pots. See the Science Buddies project Can the Color of Your House Reduce Your Energy Bill?
  • Try re-orienting the oven towards the sun once or twice an hour, vs. leaving the oven stationary.
  • For a more advanced project, study the plans at the Solar Cooking Archive page (SCI, 2006b). Choose two or three different types of solar ovens to build, and see which design is most efficient at heating a standard volume water (e.g., 1 L).

Credits

Andrew Olson, Ph.D., Science Buddies

Sources

The original plans for the solar cooker used in this project are from:

Alternative Sources for Paper Fiber

Objective

The goal of this project is to make your own paper, test it, and rate its quality, using either recycled paper or plant fibers as the source material.

Introduction

What do you think is the biggest single category of solid waste in the U.S.? Well, since this is a project about paper, that would probably be a good guess. In fact, it's the right answer! According to the U.S. Energy Information Administration, paper and paper products account for 39%, by weight, of the trash we throw away (EIA, date unknown). Newspapers take up 14% of landfill space, and paper products from packaging take up another 15–20% (EIA, date unknown).

Most paper comes from wood pulp (a renewable resource). What other fiber sources can be used to make paper? How can we reduce the amount of paper going to landfills?

In this project you will learn how to make your own paper, using either recycled paper or plant fibers as starting material. You should do background research to learn about the materials that are used in paper, and to find sources of plant fibers that are available locally.

Terms, Concepts and Questions to Start Background Research

To find more information on this project, try researching the following terms and concepts:

  • papermaking,
  • lignins,
  • cellulose,
  • stem fibers,
  • leaf fibers,
  • bast fibers,
  • paper pulp.

Questions

  • What part of a plant do "bast fibers" come from?
  • What are the primary sources of cellulose fiber for manufacturing paper today?

Bibliography

Here are some online references on making paper:

Materials and Equipment

To do this experiment you will need the following materials and equipment:

  • starting material for making paper pulp:
    • recycled paper,
    • plant material: stem fibers, leaf fibers, bast fibers
    • plain gelatin (for "sizing");
  • for preparing plant fibers, you will need:
    • rubber gloves to protect your hands,
    • safety goggles,
    • apron or lab coat,
    • large stainless steel or enamel cooking pot,
    • wood ash, or soda ash (sodium carbonate),
    • net bag to hold pulp while rinsing,
    • litmus paper to test pH of rinse water,
    • blender or wooden mallet for processing fibers after cooking;
  • for making paper from pulp you will need
    • mold and deckle, which can be made with:
      • 2 5" × 7" picture frames (must have flat faces),
      • a 7" × 9" piece of window screen (plastic, not wire screen material is best),
      • staple gun or hammer and tacks;
    • large plastic box (dishpan or storage box),
    • stack of absorbent cloths,
    • sponge,
    • boards to keep paper flat while drying.

Experimental Procedure

The following sections explain the process of making paper by hand. To turn paper-making into a science fair investigation, see the suggestions in the Variations section.

Making Pulp from Recycled Paper

  1. Cut paper into small pieces, about 2–3 cm on a side.
  2. Soak the paper pieces in water overnight.
  3. To make pulp, add a handful of the soaked paper to the blender, and fill about three-quarters full with warm water.
  4. Blend until your pulp has the consistency of oatmeal (up to one minute). If the blender bogs down, use less paper.
  5. Pour the mixture into your plastic box. You will probably need to add more water. The pulp should be roughly 90% liquid.
  6. Repeat blender cycles until you have enough pulp for dipping the mold and deckle.
  7. Note: this procedure is from Mendelow, 1999.

Making Pulp from Plant Material

  1. Plant material needs to be cooked in alkaline solution to remove lignins from the cellulose pulp.
  2. Cut the plant material into small pieces.
  3. Cut the stems, vines or leaves into 5–7 cm pieces. Process leaves and tougher stems separately.
  4. Soak plant material in water for 1–2 hours. Rinse.
  5. Put plant material in large stainless steel or enamel pot filled with cool water.
  6. Wear proper safety equipment for the rest of the cooking steps: eye protection, rubber gloves, and apron or lab coat.
  7. Carefully add soda ash (sodium carbonate) to pot and stir with wooden spoon or stick. To figure the amount of soda ash needed:
    1. weigh the dry fiber before it is soaked and use 20% of the dry material weight as the amount of soda ash needed; or
    2. use 1 tablespoon soda ash per 1 qt. water.
  8. Cook plant material for about three hours. Cool.
  9. Rinse thoroughly (suspending the cooked plant fibers in a net bag may be useful here). The pH of the pulp should be the same as your tap water (test with litmus paper) when rinsing is complete.
  10. After cooking, you will need to pound the plant fibers with a mallet and then add water, or blend them (see "Making Pulp from Recycled Paper," above) to make pulp.
  11. Note: this procedure is from Lavadour, 2004, and Marks, 2005.

Making a Mold and Deckle

  1. Use two 5" × 7" picture frames, or make your own wooden frames of similar size. Remove the backing material and glass from the frame; you won't need these, just the wood frame itself.
  2. Place the plastic window screen material over the face of one of the frames so that it is taut. Fold the material over the sides of the frame and staple or tack it in place.
  3. The mold is the frame with the screen attached. The other, empty, frame is the deckle.

Making Paper from Pulp

  1. Pour the pulp into the large plastic box.
  2. Always stir the pulp immediately before making each sheet of paper.
  3. With the mold screen-side up, place the deckle on top of the mold. The screen material will be sandwiched in between.
  4. Pick up the mold and deckle together, holding by the short sides, and slide them into the pulp, immersing the mold and deckle completely (Figure 1).

    Using the mold and deckle to lift pulp from the plastic box to form a sheet of paper.
    Figure 1. Using the mold and deckle to lift pulp from the plastic box to form a sheet of paper (Lanacaster and Junius, 2002).

  5. Holding the mold and deckle firmly, rock them back and forth gently to distribute the pulp evenly over the screen. Holding the mold and deckle horizontally, slowly lift them out of the pulp. The excess water will drain through the screen.
  6. Allow the water to drain until it is no longer dripping. This may take as long as two minutes. You may want to (carefully!) set the mold and deckle across the corner of your plastic box while it drains.
  7. When the excess water has drained, set the mold and deckle down on a flat surface and carefully remove the deckle, starting at one corner. The paper should remain attached to the screen surface of the mold (Figure 2).

    Lifting the deckle from the mold.
    Figure 2. Lifting the deckle from the mold (Lanacaster and Junius, 2002).

  8. The next step is called "couching." You need to flip the mold over, paper side down, onto the couching cloth, which will absorb more water from the paper. You can use felt, handiwipes, cut pieces from old sheets—practically any clean, abosrbent cloth will do. Use a sponge to remove excess water through the screen material of the mold (Figure 3). You can squeeze the water out of the sponge into another container or back into the plastic box with the pulp.

    Couching the sheet of paper on absorbent cloth.
    Figure 3. Couching the sheet of paper on absorbent cloth. Use a sponge to carefully remove excess water from the back side of the screen (Lancaster and Junius, 2002).

  9. When the paper begins to separate from the screen, you can carefully lift the mold away from the couching material. Start at one corner of the mold, and make sure that the paper separates cleanly and remains flat on the cloth (Figure 4).

    Lifting the mold to reveal your brand-new sheet of paper.
    Figure 4. Lifting the mold to reveal your brand-new sheet of paper (Lancaster and Junius, 2002).

  10. The finished paper needs to be dried between boards for several days, with weight on top to keep it from curling. Keep layers of cloth between the sheets of paper to permit drying. You can speed the drying process by ironing the paper between sheets of cloth. The paper should still be weighted after drying to keep it flat.
  11. Rate the quality of your paper for different tasks, for example:
    1. writing with pencil,
    2. writing with pen,
    3. painting,
    4. or perhaps even making model airplanes, or origami!

Variations

  • For making paper with recycled paper as a starting material: do you get better results with newspaper or office paper as starting material? What happens if you use glossy paper from magazines?
  • Compare the quality of the paper produced from fibers from different types of plants.
  • "Sizing" is material such as gelatin that is added to the paper pulp when the paper is to be used for writing or calligraphy. What does sizing do for the paper? Make several sheets of paper with and without sizing. Keep the sheets in separate, labeled stacks as they are drying so that you know which is which, and label the sheets when they are dry. Test the papers for suitability for writing with pencil, ballpoint pen, and fountain pen. How do the two papers work for watercolor painting?
  • Compare the resources used to make paper with recycled paper as the starting point vs. raw plant material. How much is the savings in materials and energy? How does this compare to industrial paper processing from recycled materials vs. wood pulp? What percentage of the paper goods used in your household gets recycled? How about your neighborhood, your school, or local businesses? What can you do to increase the percentage?
  • Advanced. Do background research on the growth rates of different types of plants used for paper pulp: e.g., jack pine and aspen. How do these compare to the plants that you used to make paper?
  • Advanced. Are there alternative methods to alkali treatment for removing the lignins from raw plant materials? Are these methods more environmentally friendly? Design an experiment to find out.

Credits

Andrew Olson, Ph.D., Science Buddies

How Can Your Faucet Save Water?

Objective

In this experiment you will test several water saving products to measure how much they reduce the flow of water through the faucet.

Introduction

How much water does your family use? Trying to use less water is important because water is a limited resource. Learning about water conservation issues and water saving tips can help you use less water. Many water saving tips focus on your habits and actions, like not letting the water run while you brush your teeth. But there are also many things that can be done to save water that have to do with how a structure is built.

The plumbing fixtures in your house can be water wasters or savers, depending upon the products being used. One simple way to reduce water use in your home is to install low-flow faucets or aerators in your kitchen and bathroom sinks. These products save water by reducing the water flow and adding air to the water stream so that less water comes out of the tap over the time you have it on. These products are usually simple to install and can be bought at the hardware store.

In this experiment you can test several water saving products to see which ones do the best job saving water. You will do this by measuring the flow of water in gallons per minute (GPM).

Terms, Concepts and Questions to Start Background Research

To do this type of experiment you should know what the following terms mean. Have an adult help you search the internet, or take you to your local library to find out more!

  • water use and conservation
  • flow rate
  • gallons per minute (GPM)
  • low-flow faucet
  • aerator

Questions

  • How much water can a low-flow faucet or aerator save?
  • Which type of product works best?
  • Can you estimate the potential savings for a home, school, or large office building?

Bibliography

  • Learn all about water conservation from this website developed by the City of Tampa, Florida. Learn about the issues, become a "Water Ambassador", or read award winning projects. They even offer a special "Drinking Water Award" to the best water conservation project each year! Check it out:
    City of Tampa, 2006. "Water Education and Conservation," Tampa, FL. [accessed June 23, 2006] http://www.tampagov.net/dept_Water/conservation_education/
  • AWWA, 2006. "Water Wiser," Denver, CO: American Water Works Association (AWWA). [accessed June 23, 2006] http://www.awwa.org/waterwiser/
  • This site has a java applet you can use to make printable, color graphs of your data:
    NCES, 2006. "Create a Graph," National Center for Education Statistics (NCES) U.S. Dept. of Education. [accessed March 3, 2006] http://nces.ed.gov/nceskids/createagraph/

Materials and Equipment

  • several faucet aerator attachments from different manufacturers
  • kitchen or bathroom sink
  • large collection bowl (not too big to fit in the sink though!)
  • a large measuring cup
  • stopwatch
  • masking tape
  • tools (a wrench and pliers)

Experimental Procedure

  1. Shop for low-flow faucet aerators from the hardware store. Choose at least 4 different water saving products.
  2. Read the instructions and have an adult available to help you install the hardware on a kitchen or bathroom faucet.
  3. Install the first faucet product by following the manufacturer's instructions. After installing each aerator you will test it for water use before installing the next product. You should do at least three separate tests for each product and then average your results to get better data.
  4. Test each faucet product after installing it by running water for 10 seconds from the faucet into a collection bowl. To keep the flow of water constant, mark where you turn the faucet with a piece of masking tape so that you turn it to the same place each time. To keep the time constant, set a stop watch to 10 seconds and turn off the water when it beeps.
  5. Pour the water from the collection bowl into a large measuring cup and record the amount of water in a data table:

    ProductVolume Time Gallons per Minute (GPM)
    OuncesGallonsSecondsMinutes

  6. You collected water for 10 seconds, but usually the amount of water flow is given in gallons per minute. So you will need to do some calculations to convert your measurements.
  7. First, convert the volume measurement. Since you measured in ounces, and there are 128 ounces in a gallon, then divide your answer by 128 to get your measurement in gallons.
  8. Now convert the time from seconds to minutes. Since there are 60 seconds in a minute, if you divide your answer by sixty it will be in minutes.
  9. To calculate the rate of flow in gallons per minute (GPM) divide the measurement of volume in gallons by the measurement of time in minutes.
  10. After you have all of the products measured in gallons per minute, make a graph of your data. You can make your graph by hand, or use a site like Create A Graph to make your graph on the computer.
  11. Compare the results using your graph. Which products worked the best?

Variations

  • Calculate the weekly, monthly, and yearly savings of using a faucet aerator. Ask your parent for a water bill and find out how much they spend on each gallon of water. Then use your results to calculate the potential savings. Do the potential savings fall short of, meet, or exceed the initial cost? How long does it take to recover the initial cost with savings?
  • Should you shower or take a bath? Try a similar experiment to see if a shower or bath will use more water. You can also find low-flow shower heads to test with a similar experiment. What is the best way to bathe and conserve water?
  • To flush or not to flush, that is the question! Test these water saving household toilet tips. How much water does your toilet use for each flush? How much water could you save by flushing every other time? Can sinking a brick in your tank help reduce the water used?

Credits

Sara Agee, Ph.D., Science Buddies

Can the Color of Your House Reduce Your Energy Bill?

Objective

In this experiment you will investigate if the color of a structure affects the temperature inside the structure when in different environments.

Introduction

How does the color of your house affect the temperature inside of it? Consider this explanation by Jill Morton at ColorMatters.com:

"When summer comes to your Hemisphere, can color reduce the energy consumption in your home or business? Consider this: Would you be cooler wearing a light shirt or a dark shirt on a hot sunny day? If your science teacher or parents didn't convince you, the scientific fact is that white reflects the radiant energy rays of the sun and black absorbs them.

The same principle has a significant impact on a house. The hotter the roof, the hotter the rooms below. Light colored roofing and /or reflective coatings are like a white shirt for your house because they reflect radiant energy. Even a light gray hue is better than a blue or green." (Morton, 2006)

House Colors

In this experiment you will test this idea by painting shoe boxes with light, medium, or dark colors to model painted houses. Then you will put the boxes in warm and cool environments and measure the temperature inside each box. Will color matter?

Terms, Concepts and Questions to Start Background Research

To do this type of experiment you should know what the following terms mean. Have an adult help you search the internet, or take you to your local library to find out more!

  • surface temperature
  • indoor temperature
  • outdoor temperature
  • reflection
  • absorption

Questions

  • How different are the surface, indoor, and outdoor temperatures of a structure?
  • How do colors that reflect or absorb light affect the indoor temperature of a structure?
  • Which colors are best for saving energy in hot or cold climates?

Bibliography

  • This project idea was adapted from a science fair project by William S. in Mrs. Hannemann's 3rd grade class at Williams Elementary in Rockledge, Florida:
    S., William, 2003. "Does the color of your house affect the temperature inside of it?" Williams Elementary, Rockledge, Florida. [accessed June 23, 2006]
    http://www.energywhiz.com/3-5/SCIFAIR/2003WilliamS.htm
  • Morton, J. L., 2006. "Color and Energy Matters," ColorMatters.com [accessed June 23, 2006]
    http://www.energywhiz.com/
  • This site has a java applet you can use to make printable, color graphs of your data:
    NCES, 2006. "Create a Graph," National Center for Education Statistics (NCES) U. S. Dept. of Education. [accessed March 3, 2006] http://nces.ed.gov/nceskids/createagraph/

Materials and Equipment

  • 3 shoe boxes
  • 4 thermometers
  • heat lamp
  • large tray
  • ice
  • rock salt
  • plastic bag (preferably white)

Experimental Procedure

  1. Collect 3 shoe boxes of the same size.
  2. Paint one box white, one box gray, and one box black. Allow the paint to dry completely.
  3. Put a thermometer in each box, place the boxes on a table and place another external thermometer on the table.
  4. Record the "Starting Temperature" of each thermometer in a data table:

    BoxColorStarting Temperature (oC)Room Temperature (oC)Heated Temperature (oC) Cooled Temperature (oC)
    nonenone
    1White
    2Gray
    3Black

  5. Put the lids on the boxes and leave at room temperature for 30 minutes.
  6. Take each lid off and quickly record the "Room Temperature" in the data table.
  7. Put the lids back on and place a heat lamp above the boxes to simulate a warm, sunny day.
  8. Arrange the boxes underneath the lamp so that they are all equally distant from the light source. This will be a control to be sure that one box is not getting more light or heat than another box because it is closer to the light source. Put the last thermometer in the center of the boxes to measure the external temperature of the environment.
  9. Leave the boxes and the external thermometer under the heat lamp for 30 minutes.
  10. Take each lid off and quickly record the "Heated Temperature" in the data table.
  11. Were the temperatures the same or different? If the temperatures were different, which box heated up the most or the least?
  12. Put the lids back on and keep the heat lamp above the boxes but add a tray of ice beneath the boxes to simulate a sunny winter day. Make the tray of ice by sprinkling a layer of ice with rock salt and covering with a white plastic bag to keep the boxes dry.
  13. Arrange the boxes underneath the lamp on the ice tray so that they are all equally distant from the light source and put the thermometer in the center of the boxes.
  14. Leave the boxes and the external thermometer on the ice tray under the heat lamp for 30 minutes.
  15. Take each lid off and quickly record the "Cooled Temperature" in the data table.
  16. Were the temperatures the same or different? If the temperatures were different, which box stayed warmest? Which box cooled off the most?
  17. After you have recorded all the temperatures, make a graph of your data. You can make your graph by hand, or use a site like Create A Graph to make your graph on the computer.
  18. Compare the results using your graph. Which colors worked the best to reduce temperature changes in which conditions?

Variations

  • What about colors other than black, white, and gray? You can make this project more difficult by increasing the number of colors you choose. Most major paint manufacturers can tell you the Light Reflectance Value (LRV) of any color paint chip. White reflects 80% of the light and black reflects 5%. You can conduct your test for a series of colors with different LRV values. Will the temperature increase or decrease with the LRV number of the paint color? Which colors should you choose for hot or cold climates? What about climates with four full seasons?
  • House color is only one aspect of house design. Does the material you choose on the outside of your house make a difference? In this experiment you used a painted shoe box, a paper product, to simulate a painted house. What about real materials used to cover houses? Try the experiment using different materials: adobe, stucco, wood, siding, metal, etc. Which materials are the coolest or the warmest? Use a light and dark colored version of each material. Do some materials have more extreme temperature differences than others? Which materials are the most stable against fluctuations? Which type of climate is suited best by each material?
  • Another way to save energy is to use insulation, a material that is placed inside the walls of a structure to keep the indoor temperature from fluctuating. Compare different materials used for insulating walls: fiberglass, paper. Try a similar experiment by wrapping the shoe box with each material. Which materials provide the most stable indoor environment? Look up the R-factor for each material. Does it correlate with your results?

Credits

Sara Agee, Ph.D., Science Buddies

This project idea was adapted from a science fair project by William S. in Mrs. Hannemann's 3rd grade class at Williams Elementary in Rockledge, Florida: S., William, 2003. "Does the color of your house affect the temperature inside of it?" Williams Elementary, Rockledge, Florida. [accessed June 23, 2006] http://www.energywhiz.com/3-5/SCIFAIR/2003WilliamS.htm

Engineering News

Central Board of Secondary Education

Architecture News

Management News

Medical News

Journalism News

ss_blog_claim=39d0fbd9150037431cf33bbbf3c7c7ce